Simple rinsing with water is an illusion of cleanliness; only methodical decontamination guarantees pure flavor.
- Stubborn flavor residues (like mint or coffee) aren’t just on the surface; they embed themselves into the micropores of the metal and seals.
- Water temperature and perfect drying are more important than the cleaning method itself for preserving your equipment and e-liquid quality.
Recommendation: Adopt a near-surgical cleaning protocol, treating each component with the appropriate technique to eradicate 100% of ghost flavors.
It is a familiar moment for any demanding vaper: you have just filled your tank with a new tobacco-flavored e-liquid, complex and subtle. You take your first puff, eager to discover its nuances… and it’s a disappointment. A persistent aftertaste of icy mint, a vestige of your previous liquid, ruins everything. This cross-contamination, this “ghost flavor,” is the arch-enemy of the vaping experience. Many believe that a simple rinse with hot water is enough, or that the new liquid should just “drown out” the old one. These approaches are incomplete at best, and at worst, a recipe for guaranteed frustration.
The truth is that flavor molecules, especially the most powerful ones like mint, coffee, or certain red fruits, adhere to surfaces much more stubbornly than one might imagine. They lodge themselves in the threads, saturate the silicone seals, and create an invisible film on the glass and metal. To achieve absolute purity of flavor, you cannot settle for “rinsing.” You must proceed with a true molecular decontamination of every component.
But what if the key wasn’t just in the products used, but in the scientific understanding of every action? What if water temperature, the drying method, or the inspection of a simple rubber seal had more impact than the most powerful detergent? This article will guide you through a meticulous cleaning protocol, where every step is justified, so that no parasitic taste ever spoils your pleasure again. We will dissect the best techniques, from high-tech to traditional, to transform your tank into a blank slate, ready to welcome the purest of flavors.
To master this art of purity, we will address every critical aspect of deep cleaning. This summary will guide you through the techniques and mistakes to avoid for a perfect flavor transition.
Table of Contents: Tank Decontamination Guide for Intact Flavor
- Why do ultrasonic waves strip away residues inaccessible by hand?
- White vinegar or baking soda: Which grandmother’s recipe kills the smell of coffee?
- The mistake of leaving a drop of water that dilutes your liquid and makes it pop
- Warm water vs. boiling water: Which temperature won’t cook your rubber seals?
- When to use an interdental brush to scrub the airflow?
- The neglected habit that turns your mouthpiece into a breeding ground for bacteria
- Vapor vs. Smoke: Which disappears from your curtains in less than 10 minutes?
- How to spot the defective O-ring causing a slow leak?
Why do ultrasonic waves strip away residues inaccessible by hand?
Manual cleaning, even with the best brush, quickly reaches its limits. Caramelized vegetable glycerin residues and stubborn flavor molecules lodge themselves in the threads, engravings, and unreachable corners of your atomizer. This is where ultrasonic technology becomes a necessity for the purist, rather than a luxury. The principle isn’t magic; it’s physics: it’s called cavitation. An ultrasonic cleaner generates high-frequency sound waves in water, creating millions of microscopic bubbles. These bubbles don’t burst; they implode upon contact with the metal parts.
This implosion creates a tiny but extremely powerful shockwave capable of stripping away the most encrusted dirt without damaging the metal. It is mechanical cleaning on a nanometric scale, far more effective than any scrubbing. This is the only method that guarantees every nook and cranny of your atomizer is decontaminated. For particularly invasive flavors like mint, menthol, or anise, an ultrasonic cycle is the definitive solution to start again on a truly neutral base.
Think of it as microscopic sandblasting, but with water. The result is a surgical cleanliness, impossible to obtain otherwise, which perfectly prepares the ground for a new flavor.
White vinegar or baking soda: Which grandmother’s recipe kills the smell of coffee?
When faced with particularly stubborn flavors like coffee, dessert tobacco, or licorice, even ultrasonics may require chemical help. Before resorting to aggressive solvents, traditional solutions, when properly understood and combined, offer formidable efficiency. The duo of white vinegar and baking soda isn’t just a tip; it’s a targeted chemical reaction. Vinegar, with its acetic acid, acts as a mild solvent that dissolves organic and mineral deposits. Baking soda, a weak base, is an exceptional odor neutralizer, and its effervescence upon contact with acid creates a mechanical action that helps dislodge particles.
However, for the most complex aromas, a third ingredient can make all the difference: ethanol (70% or 90% alcohol, or even neutral vodka). Alcohol is a very effective solvent for aromatic compounds that water and vinegar struggle to dissolve. Combining the three creates a complete cleaning solution: vinegar dissolves, baking soda neutralizes and scrubs, and alcohol finishes off the most recalcitrant flavor molecules. This is the ultimate protocol for chemically “resetting” your tank.
Advanced Chemical Decontamination Protocol
A method proven by many expert vapers involves completely dismantling the atomizer (removing the seals), then preparing a specific solution. In a small container, mix 5cl of white vinegar with two teaspoons of baking soda. After the initial effervescence, add a few drops of ethanol. Submerge the metal parts and the Pyrex for about ten minutes. The result is a near-perfect neutralization of the most persistent ghost flavors before a thorough rinse with clear water.
It is crucial to rinse thoroughly after this treatment and, as we will see, to perfectly dry each piece to avoid introducing new problems.
The mistake of leaving a drop of water that dilutes your liquid and makes it pop
You have meticulously cleaned every part; your atomizer shines with cleanliness. You reassemble it, fill it with your precious e-liquid, and at the first puff, a violent crackling or “popping” is heard, sometimes accompanied by spits of hot liquid. This is the signature of imperfect drying. The most common and detrimental error after cleaning is underestimating the impact of a single residual drop of water. A micro-droplet hidden in the chimney, the airflow duct, or at the bottom of the tank can ruin your experience.
The phenomenon is simple: when this water drop comes into contact with the coil heated to over 200°C, it undergoes flash vaporization. The water instantly turns into a large amount of steam, creating overpressure that makes the liquid “pop” and can even cause leaks through the airflow. Furthermore, this residual water will inevitably dilute your e-liquid. This alters not only the nicotine concentration but especially the flavor fidelity, resulting in a bland and watery taste. Obsessive drying is therefore a non-negotiable step of the purity protocol. Using a microfiber cloth, paper towels rolled into a point for the ducts, and above all, letting the parts air dry for at least one hour is imperative.
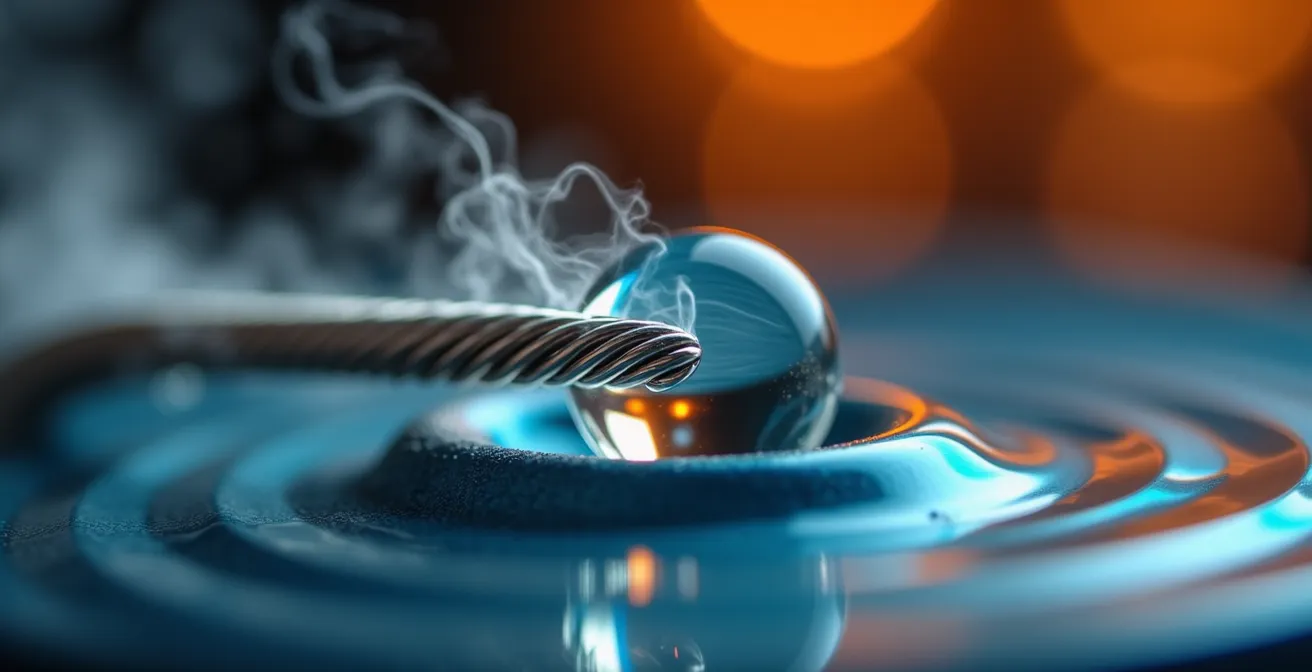
As this close-up view shows, the encounter between water and a hot coil is explosive on a microscopic scale. Drying is not just a finishing step; it is an active phase of preparation, ensuring that only your e-liquid will be vaporized.
Never be in too much of a hurry. Patience during drying is the best insurance against popping and diluted taste.
Warm water vs. boiling water: Which temperature won’t cook your rubber seals?
In the quest for cleanliness, instinct often pushes us to use the hottest water possible, even boiling, based on the principle that “the hotter it is, the better it cleans.” This is a fundamental mistake that can irreversibly damage the most crucial components of your atomizer: the silicone O-rings. These small colored rings are the guardians of the seal. Subjecting them to excessive heat is their death sentence. Silicone, although resistant, is a polymer that reacts to heat. Exposure to boiling water can “cook” it, causing it to expand permanently, lose its elasticity, or become brittle.
A seal that has lost its properties no longer fulfills its role. It becomes too loose, creating micro-leaks that worsen over time, or conversely, it hardens and cracks, breaking during the next disassembly. The ideal temperature for effective cleaning without risk is well below the boiling point. Indeed, as experts recommend, water at a maximum of 60°C preserves the integrity of the seals while being hot enough to help dissolve vegetable glycerin residues.
Watch out for water that is too hot, as it could loosen the seals
– iClope, Vape Maintenance Guide
This warning is essential. Hot tap water is more than sufficient. The supposed gain in cleanliness from boiling water is negligible compared to the certain risk of having to replace all your seals and turning your atomizer into a sieve.
Cleanliness must never come at the expense of integrity. Intelligent cleaning is cleaning at the right temperature.
When to use an interdental brush to scrub the airflow?
The air duct, or “airflow,” and the central chimney are the lungs of your atomizer. Unfortunately, they are also critical areas where dried residues, flavor-laden condensation, and dust accumulate. Cleaning by simple rinsing is often ineffective. To reach and mechanically scrub these narrow ducts, a simple and inexpensive tool proves to be an indispensable ally: the interdental brush. This instrument, designed for dental hygiene, has the perfect size and rigidity for precision cleaning.
Using the brush is particularly recommended during every full cleaning, or as soon as you perceive a slight obstruction or abnormal whistling in the airflow. It allows you to gently “scrape” the internal walls to dislodge biofilms of residues that water alone cannot remove. It is also the ideal tool for cleaning 510 threads, ensuring a perfect electrical connection between the atomizer and the box. Choosing the right size is crucial: too large, and it won’t fit; too thin, and it will be ineffective. Having an assortment of sizes allows you to adapt to all types of atomizers, from the finest pods to the widest sub-ohm clearomizers.
Your Action Plan for Precision Mechanical Scrubbing
- Choose the right size: Opt for a fine brush (0.6-0.8mm) for pods or MTL devices, and a medium size (1-1.2mm) for large airflow clearomizers.
- Dismantle: Ensure the tank is fully disassembled and the coil is removed for complete access.
- Insert and rotate: Gently insert the brush into the airflow duct or chimney while rotating it to dislodge residues.
- Repeat the operation: Perform 5 to 10 full rotations. Rinse the brush between each pass so as not to redeposit dirt.
- Clean the threads: Use the same technique to clean the 510 threads, guaranteeing optimal electrical contact without residues.
After using the brush, a final rinse followed by a powerful blow into the duct helps expel the last particles before drying.
The neglected habit that turns your mouthpiece into a breeding ground for bacteria
One can spend hours polishing the tank and scrubbing the coil but forget the most obvious and exposed element: the mouthpiece, or drip-tip. It is the only part of your vape in direct and constant contact with your mouth. It is also a magnet for dust, crumbs from the bottom of a bag, pocket lint, and inevitably, bacteria. Neglecting its hygiene is like using the same fork for days without washing it. It is absolute nonsense in terms of cleanliness.
Drip-tip maintenance shouldn’t be a weekly task but a daily, or even multi-daily, reflex. According to vape hygiene experts, the drip-tip should be cleaned several times a day. A simple rinse under hot water at every refill is a minimum. For a deeper clean, a few drops of dish soap or a quick soak in a baking soda solution helps remove the greasy film that builds up and neutralizes germs. A small brush or a fine interdental brush is perfect for cleaning the inside of the duct where condensation accumulates.
This discipline is not just a matter of hygiene; it also has a direct impact on flavor. A clean drip-tip ensures that nothing comes between the pure vapor produced by your atomizer and your palate. It is the final touch, the seal of a truly clean and healthy vaping experience, from the coil to your lips.
Consider your drip-tip like a piece of cutlery: cleaning it isn’t an option; it’s a necessity after every “meal.”
Vapor vs. Smoke: Which disappears from your curtains in less than 10 minutes?
The obsession with perfectly clean vaping equipment finds its justification in the very nature of vapor. Unlike cigarette smoke, e-liquid vapor is not a product of combustion. Tobacco smoke is composed of thousands of particles of tar, carbon, and chemicals that are fine, greasy, and sticky. They penetrate fabrics, yellow walls, and permanently permeate the environment with a stubborn odor. Vapor, on the other hand, consists mainly of droplets of propylene glycol, vegetable glycerin, water, and flavorings. These droplets are larger and much less volatile.
This fundamental difference is visible to the naked eye and has a direct impact on your interior. While smoke clings and stains, vapor dissipates into the air within minutes without leaving a persistent residue or stagnant smell. A curtain exposed to cigarette smoke will retain a yellowish tint and a cold tobacco smell for days, if not weeks. The same curtain exposed to vapor will return to neutrality in less than ten minutes once the droplets have evaporated.

This visual distinction is the best proof of the intrinsic cleanliness of vaping. Making the effort to keep your equipment perfectly clean is simply being consistent with choosing an alternative that respects your environment. Clean equipment produces pure vapor, which dissipates without leaving a trace, completing the virtuous circle of cleanliness.
You have chosen a cleaner alternative for your body and your environment; it is therefore logical to apply the same standard to your equipment.
Points to Remember
- Drying is as crucial as cleaning: a single residual water drop ruins the flavor and causes popping.
- Water temperature is a critical parameter: never exceed 60°C to avoid “cooking” and permanently damaging the seals.
- Drip-tip hygiene is non-negotiable: cleaning it several times a day is a minimum to avoid bacterial proliferation and preserve flavor purity.
How to spot the defective O-ring causing a slow leak?
You’ve done everything right: the cleaning is impeccable, the drying is perfect, the coil is new. Yet, you notice a thin film of liquid at the base of your atomizer or around the airflow ring. This is the symptom of a slow leak, often caused by the humblest but most vital component: the O-ring. A single defective seal can turn the best atomizer into a permanent source of hassle. Knowing how to inspect and diagnose a worn seal is an essential preventive maintenance skill.
Inspection should be visual and tactile and should take place during every full cleaning. A healthy seal is flexible, uniform in color, and perfectly round. A defective seal shows obvious signs of fatigue: it may be flattened or crushed in one spot, have lost its elasticity, show micro-cracks, or be “pinched” with a small nick on the side. Discoloration (e.g., an orange seal that has turned dark brown) is also a sign of aging and saturation by e-liquids. The slightest doubt should lead to immediate replacement. Manufacturers almost always include a set of spare seals; do not view them as options, but as wear-and-tear parts to be used.
Ignoring a tired seal is a financial risk. In Canada, a damaged seal can make a $50 CAD tank unusable due to constant leaking. Regular inspection and the preventive replacement of a seal costing a few cents is one of the most cost-effective maintenance actions for a vaper.
The conclusion is simple: the quest for perfect flavor doesn’t stop at cleanliness; it extends to the mechanical integrity of every component. Take care of your seals, and your atomizer will take care of your e-liquids (and your pockets).
Frequently Asked Questions about Atomizer Maintenance
How often should I check the condition of the seals?
It is important to check the condition of your silicone seals during every full cleaning, which is approximately every 2-3 weeks.
How do I recognize a worn seal?
A seal that is flattened, pinched, cracked, or has lost its bright color (e.g., an orange seal turned brown) must be replaced immediately.
Can I extend the life of the seals?
Yes, by lightly lubricating them with a drop of e-liquid before screwing the parts together to avoid pinching or twisting them.